How to show the voting results

To show the voting results (interim or final), as well as final voting scores calculated by Outlook, do the following:
1. Open the original message you sent (usually, you can find it in the Sent Items or Sent Mail folder). If you have multiple email accounts in Outlook, each email account has its own Sent *** folder:

The Tracking icon ![]() appears only after tracking information is available for that message (see notes below). Until you see this icon, there is no tracking information in Outlook.
appears only after tracking information is available for that message (see notes below). Until you see this icon, there is no tracking information in Outlook.
2. On the original message window, on the Message tab:
- If you use the Simplified ribbon (see more about customizing ribbons), click the Tracking button next to the Message button:

- If you use the Classic ribbon, in the Show group, click the Tracking button:
 or
or

Notes:
- The Tracking button, just like the Tracking icon, doesn't appear until at least one recipient of the email message has replied with their vote.
- Be patient! This button on the Message tab can appear after a delay (usually after several sessions of Sent/Receive).
You can run Sending and receiving messages manually or even restart your Outlook.
- Before sending a message with Voting Buttons, check the options of your account mailbox.
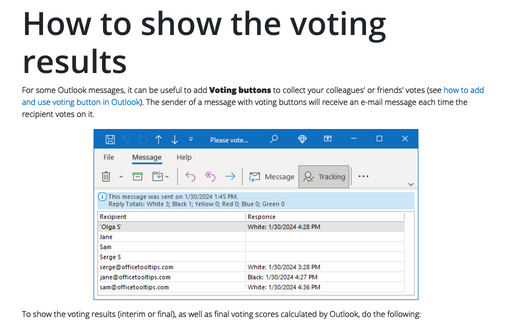
3. In the opened tracking list, you will see:
- The vote totals are tallied at the top of the tracking list (highlighted in blue),
- The list of people you asked to vote with their responses:

Notes:
- Only the meeting organizer can find out who and how they responded using the tracking list.
- If you are seeing all incoming replies (see how to stop receiving such replies), you can also track replies by clicking the message "The sender responded: ***" at the received email, and then clicking View voting responses in the drop-down menu:

- If recipients send comments in addition to or instead of voting buttons, those comments will be stored in the Inbox folder as regular email messages. They do not appear on the tracking page of the original message.
- If someone responds more than once, you will receive an email for each of their responses, but the last response received will be counted for tracking information.
So, after the second received responses:

The Tracking list will display the updated information:

Export the voting responses to an Excel spreadsheet
Outlook provides the ability to copy survey results for further processing, for example, in Excel. To copy voting results into Outlook and paste them into Excel, follow these steps:
In Outlook:
1. On the Message window, open the Tracking list (see above how to do that).
2. Select the responses that you want to copy by doing one of the following:
- To select all or adjacent rows, click the first row, hold down the Shift key, and then click the last row.
- To select nonadjacent rows, click the first row, hold down the Ctrl key, and then click additional rows one by one:
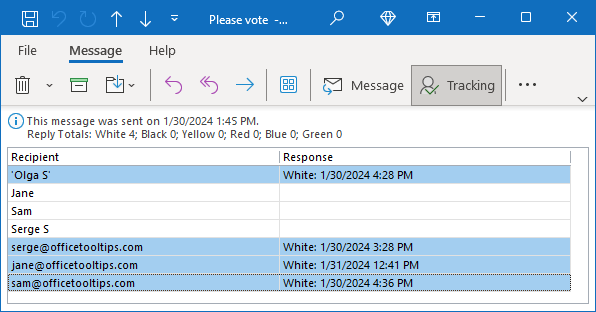
3. Press Ctrl+C to copy selected rows to the Clipboard.
In Excel
4. Select a cell, and then press Ctrl+V to paste kept rows from the Clipboard:
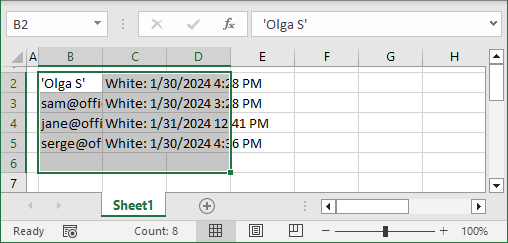
You will then need to adjust the width of the columns to see all the data.
Note: The vote totals tallied at the top of the Tracking page are not copyable.
View Sent email messages
To track the voting results, you need an outgoing message with Voting buttons to be saved in the Sent Items (Sent Mail) folder. To make sure that your outgoing emails are saved, follow these steps:
1. On the File tab, click the Options button:

2. In the Outlook Options dialog box, open the Mail tab.
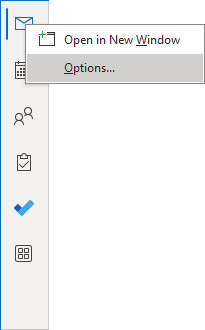
Note: You can easily open the Mail tab in the Outlook Options dialog box by right-clicking the Mail icon in the Navigation bar and choosing Options... in the popup menu:
 or
or
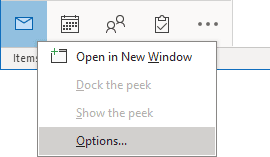
See more about customizing the Navigation bar in Outlook.
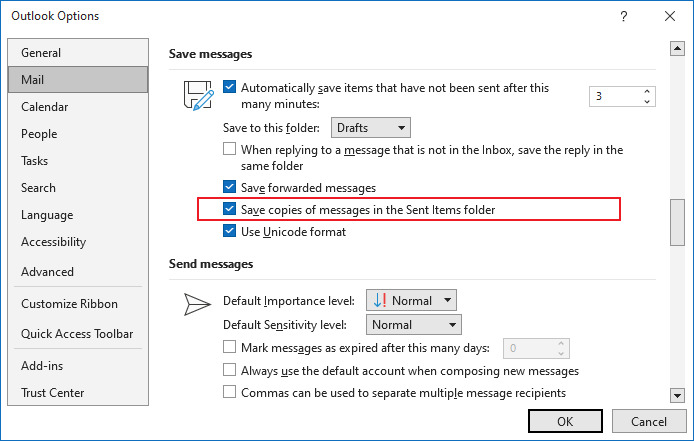
3. In the Outlook Options dialog box, on the Mail tab, under Save messages, ensure that the Save copies of messages in the Sent Items folder is selected:
Tracking options
When you organize a poll using Voting buttons, especially if you need to poll many people, receiving all the responses in your Inbox folder can be inconvenient. You can configure Outlook to automatically remove all processed responses without comments from the Inbox folder. To customize Outlook in such a way, follow the next steps:
1. On the File tab, click the Options button.
2. In the Outlook Options dialog box, on the Mail tab, under Tracking, select the Update tracking information, and then delete responses that don't contain comments option to remove all incoming messages with an empty body:
If you deselect the Update tracking information, and then delete responses that don't contain comments option, all incoming messages with the responses in the subject and an empty body will be stored in the Inbox folder (or in another folder if you use the appropriate rules).
Account options for tracking
To be sure that your Outlook will automatically analyze answers and show tracking information, check the customization of your account:
1. Open the account options:
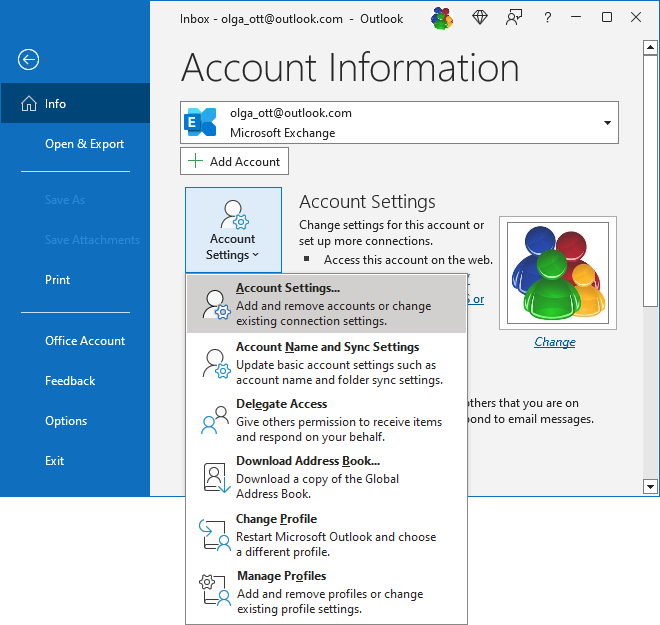
1.1. On the File tab, in the Info pane, click the Account Settings button.
1.2. Select Account Settings... in the list:
2. In the Account Settings dialog box, on the Email tab, select the account and click the Change... button:
3. In the IMAP Account Settings dialog box, make sure that the option Don't save copies of sent items is unselected:

4. Click the Next button to see that all changes are applied:

See also this tip in French: Comment afficher les résultats du vote.
