How to add and use voting buttons in Outlook
Recipients of such a survey can use the Voting Buttons to reply to your email, and Outlook calculates the results automatically. You can also export the answers to an Excel spreadsheet.
Add the Voting Buttons to the email message
To add Voting Buttons to an email message (new or reply), follow these steps:
1. On the Message window, on the Options tab:
- If you use the Simplified ribbon (see more about customizing ribbons), click the Use Voting Buttons button (if you don't see these elements on the ribbon, click the More commands button - three points to the very right of the ribbon buttons):

- If you use the Classic ribbon, in the Tracking group, click the Use Voting Buttons button:
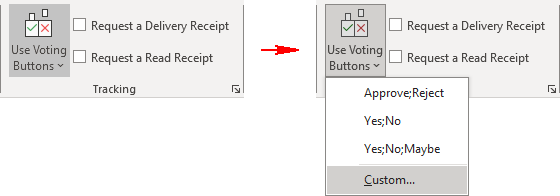
2. Select one of the following:
- Approve; Reject - If you only want to receive approvals or rejections for your question or proposal.
- Yes; No - This is the best choice when you want only a clear yes or a no.
- Yes; No; Maybe - This voting option offers recipients a third option.
- Custom... - Click this command to create custom names for the voting buttons.
If you choose the Custom... item, it opens the Properties dialog box. In the Properties dialog box, under Voting and Tracking options:
- Select the Use voting buttons checkbox,
- Select and delete the default button names,
- Type your own choices in the Use voting buttons text box, separated by semicolons:

Notes:
- If you immediately start filling out the Use voting buttons text field with your data, the checkbox will be selected automatically.
- By default, all replies are returned to the sender. To send replies to someone other than the sender, multiple people, or even a group, select the Have replies sent to checkbox, then type an email address or click the Select Names... button to search the addresses.
See more about using the Have replies sent to option.
- To set the start and end date and time of voting, select the Do not deliver before and Expires after checkboxes.
See more about how to send an email later and set the expiration date and time for email messages.
After adding the voting buttons to the outgoing message, Outlook displays the message "You added voting buttons to this message." above the message header:

Notes:
- Not every recipient of your email may understand that there are voting buttons in the email that you need to click to vote. Be clear about this in the subject or message body so they know about the voting buttons, and you can process responses correctly.
- The maximum number of voting buttons is 32. If you have more than 32 voting buttons in a message, Outlook discards them all without warning the user.
- Unfortunately, at the time of this writing, if you send a message with voting buttons from an Outlook.com account, they will not work. This means you can add these buttons, but recipients won't see them in their emails.
Remarque: Currently, this functionality is not supported within Outlook for Web or Outlook for Mac.
Reply to a message with Voting Buttons - how to vote on Outlook for Windows (Desktop)
The received message will have the choices you added:
- If you open the message in a separate window, you will see:
- The message "Vote by clicking Vote in the Respond group above." right below the sender and receivers (the message can be differ depending on the Outlook version) and above the message body.
- The Vote button on the Message tab with the list of the proposed options:
- If you use the Simplified ribbon (see more about customizing ribbons):

- If you use the Classic ribbon:
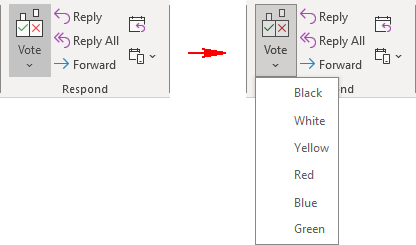
- If you use the Simplified ribbon (see more about customizing ribbons):
- If you are viewing messages in the messages list on the Content pane, right-click the message, then click the Vote list on the popup menu:

- If you read the incoming message on the Reading pane, click the message "This message includes voting buttons. Click here to vote." right below the sender and receivers (the message can differ depending on the Outlook version) to see the list of the options:

See how to customize the Reading pane for more details.
To respond with your choice, just select the appropriate element from the Vote list and click it. Outlook displays the warning window with your choice:

- To send the response immediately, ensure that the Send the response now option is selected and click OK.
- To send some additional information to the sender, such as comments on why you chose this option, select the Edit the response before sending option, then click OK to open the replying message, where you can type your comments:

Reply to a message with Voting Buttons - how to vote on Outlook for Web (Outlook online)
On Outlook on the Web (Outlook online), at the top of the email, you can see the message "The sender has requested a vote. Please choose an option". Click the "Please choose an option" link to see the vote options:

To reply with your choice, just select the appropriate element from the list and click it. Outlook displays the warning window with your choice:
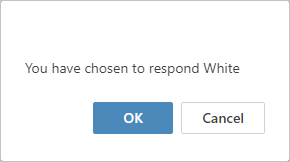
To accept your choice, click the OK button. If you have doubts or want to change your mind, click Cancel.
Voting responds
After you vote (respond to a vote request), Outlook displays a message with the date, time, and choice:
- In Outlook for Windows (Desktop):

- In Outlook for Web (Outlook online):

And, for sure, you can see the appropriate messages in your Outbox folder.
If you want to change your choice, you can select the answer again by one of the following:
- Open the message in the separate window and choose the new answer:

- Use the popup menu in the messages list on the Content pane (as displayed above).
Remarque: Unfortunately, we cannot resend voting answers from Outlook on the Web (Outlook online).
See also how to see the voting results.
See also this tip in French: Comment ajouter et utiliser les boutons de vote.
