How to create multiple Tables of Contents in one Word document
Or, according to the requirements, each chapter, section of the document must contain its Table of Contents. Otherwise, if you have extensive appendices in a document, you may need to create a separate Table of Contents for them.

The main feature of creating multiple Table of Contents is creating the bookmark for the part of the document to create its Table of Content.
So, you need to:
1. Create a bookmark for each part of the document that should contain its Table of Contents.
2. Create a Table of Contents for each bookmarked part.
3. Optionally create a full Table of Contents or Table of Contents with high labeled headings (see how to create and modify Tables of Contents). This step can be done at the very beginning.
For example:

Create a bookmark for the part of a document
To create a bookmark for the part of the Word document, do the following:
1. Select a part of the document where you need to create its Table of Contents.
2. Create a bookmark for the selection (see how to work with bookmarks for more details):

3. Repeat the previous two steps for each part of the document that should contain its Table of Contents.
Create a Table of Contents for the bookmarked part
To create a parts' Table of Contents, do the following:
1. Create an additional Table of Contents:
1.1. Position the cursor where you want to see the new Table of Contents.
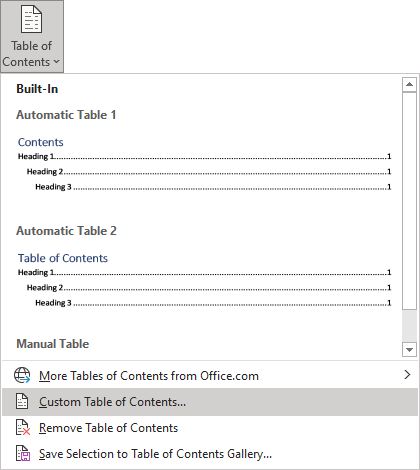
1.2. On the Reference tab, in the Table of Contents group, click the Table of Contents button:

1.3. From the Table of Contents dropdown list, select Custom Table of Contents...:
1.4. In the Table of Contents dialog box, on the Table of Contents tab (is displayed by default, all other tabs are grayed):

- From the Format dropdown list, select a visual format you prefer (see how to create and modify Tables of Contents for more details).
- In the Show levels field, type or select the number of levels you want to include in the Table of Contents.
For this example, 5 levels:

Select any other options you need (see how to create and modify Tables of Contents for more details).
Attention! We highly recommend checking the formatting requirements, accepted by your college, university, company, or agreed on the project, etc.
1.5. If you already have the Table of Contents in the document, after clicking the OK button, Word displays a message to confirm replacing the existing Table of Contents:

If you want to create an additional Table of Contents, click the No button.
2. To edit the TOC code, do one of the following:
- Select all lines of the Table of Contents or Table of Figures, including the last, empty line (see how to select the Table of Contents).
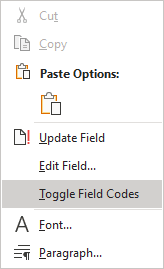
Right-click and select Toggle Field Codes in the popup menu:
Note: If not all lines are selected for the Table, you see something like this
 . Select them again and repeat this step.
Word displays the TOC field instead of the Table with all used switches.
- Press Alt+F9 to show the field codes in the document instead of the results of the field codes (see more about fields and shortcuts for working with them).
Don't forget to press Alt+F9 again after completing modifications to show the Tables of Contents and results of other fields in the document instead of the field codes.
3. In the TOC field:
- Optionally, exclude the Heading 1 from the Table of Contents to avoid duplication of the part's title – change the levels for the \ο switch.
- Add the \b switch (see more about switches of the TOC field) with the name of the bookmarked part for creating this Table of Contents.
For example:
- For the first part of the document:


- For the second part of the document:


Don't forget to update headings and any related items in a document!
Make any other adjustments you need using the formatting of the Table of Contents and Table of Contents styles formatting.
