Select and format table elements in Word
A table is a collection of information or data, usually represented in horizontal rows and vertical columns. The box at the junction of each column and row is a cell that contains data such as text, numeric information, or images. You can select the cell, row, column, or entire table and apply formatting to the selected region.
Note that you can sort data in a table, perform calculations on numbers in a Word table, insert some formulas and functions. You can use a cell address to refer to a cell in the formula.
Select table elements
To select table a single cell:
- Using the mouse: Click the left edge of the cell:

- Using the keyboard: Position the cursor on the cell and select its content by pressing Shift+arrow (left or right).
To select multiple cells:
- Using the mouse: Click the left or right edge of the highest or lowest left cell in the range and move the mouse pointer diagonally to other cells to the right or left, down or up:

- Using the keyboard: Click the first cell you want to select, and then do one of the following:
- To select adjacent cells, hold down the Shift key, and click the last cell you want to select. The first, last, and all the cells in between will be selected.
- To select non-adjacent cells, hold down the Ctrl key, and click each additional cell you want to select. All the cells you clicked will be selected.
To select a single table column:
- Using the mouse: Click the column's top gridline or top border:

- Using the keyboard: Point to the top of the column. When the cursor changes to a downward-pointing arrow, click the column.
To select multiple columns:
- Using the mouse: Click the column's top gridline or top border and move the mouse pointer to the right or left.
- Using the keyboard: When the cursor changes to a downward-pointing arrow, click the first column. Then do one of the following:
- To select adjacent columns, hold down the Shift key, and then click to select the last column.
- To select non-adjacent columns, hold down the Ctrl key, and then click to select each additional column.
To select a single table row:
- Using the mouse: Click to the left of the row:

- Using the keyboard: Point to the left edge of the row. When the cursor changes to an upward-pointing arrow, click to select the row.
To select multiple rows:
- Using the mouse: Click to the left of the row and move the mouse pointer to the rows above or below.
- Using the keyboard: When the cursor changes to an upward-pointing arrow, click the first row. Then do one of the following:
- To select adjacent rows, hold down the Shift key, and then click to select the last row.
- To select non-adjacent rows, hold down the Ctrl key, and then click to select each additional row.
See also how to select the entire table.
Format table elements
After creating a table, you can format individual cells (spaces formed by the intersection of a row and a column) or entire rows and columns by aligning text in cells, resizing columns and rows, and adding borders, shading, or colors.
Merge and split cells
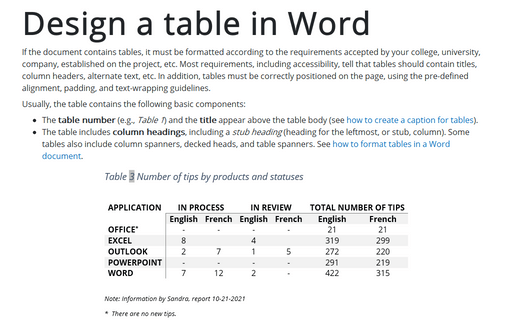
You can merge multiple cells into one cell that spans multiple columns or rows. For example, if you want to enter a heading for multiple table columns in the first row, you can merge cells in the first row (see example above).
To merge cells, select them and do one of the following:
- On the Table Layout tab, in the Merge group, click the Merge Cells button:

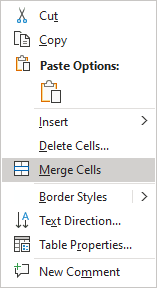
- Right-click the selection and select Merge Cells in the popup menu:
In addition to merging multiple cells to create one cell, you can split one cell to create multiple cells.
To split the cell, select it, then do one of the following:
- On the Table Layout tab, in the Merge group, click the Split Cells button:

- Right-click the selection and select Split Cells... in the popup menu:
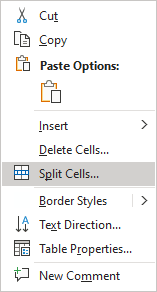
Note: The Split Cells... item in the popup menu is displayed if only one cell is selected or the cursor is positioned inside the cell. If you select multiple cells, you won't see Split Cells... in the popup menu.
In the Split Cells dialog box, specify the number of columns and rows created in place of the split cell:

Note: If you select several cells, the Merge cells before split check box in the Split Cells dialog box is selected by default:
- The selected Merge cells before split check box to force Word to merge selected cells into one, then split that one cell into the specified number of rows and columns.
- The deselected Merge cells before split check box to force Word to split every cell into the specified number of rows and columns.
Resize a table and table elements
- Using the mouse:
To resize individual rows and columns, do one of the following:
- Hover your pointer over a row or column border until your pointer becomes two lines with two arrows:

Click and hold as you drag the border to resize the row or column.
- Drag the sliders in the Table Ruler to set to desired height and width. E.g.:

- Hover your pointer over a row or column border until your pointer becomes two lines with two arrows:
- Using the keyboard:
- Select what you need to change:
- Position the cursor in a cell in the row or the column, or
- Select entire row or column, or multiple rows or columns.
- Do one of the following:
- On the Layout tab, in the Cell Size group, change the values in the Height and Width fields:

- Open the Table Properties dialog box by doing one of the following:
- On the Table Layout tab, in the Table group, click the Properties button:

- Right-click the table and select Table Properties... in the popup menu:
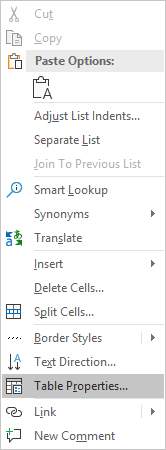
In the Table Properties dialog box:
- On the Row tab, under Size, select the Specify height check box, then:
- In the Specify height field, type or select the value you need,
- In the Row height is dropdown list, select one of the items:
- At least to specify the minimal height,
- Exactly to fix the row height:

Note: To specify a height for other rows, click the Previous Row and Next Row buttons. Word highlights the appropriate row.
- On the Column tab, under Size, select the Preferred width check box, then:
- In the Preferred width field, type or select the value you need,
- In the Measure in dropdown list, select one of the items:
- Percent to specify the percentage of the table width,
- Inches to fix the column width:

Note: To specify a width for other columns, click the Previous Column and Next Column buttons. Word highlights the appropriate column.
- On the Cell tab, select the Preferred width check box to specify the width for the current column:

- On the Table Layout tab, in the Table group, click the Properties button:
- On the Layout tab, in the Cell Size group, change the values in the Height and Width fields:
- Select what you need to change:
Note: See more about formatting a table.
Align text in a Word table cell
To align the text in one or more cells, select them, and then on the Table Layout tab, in the Alignment group, choose one of the nine proposed alignments:

- Align Top Left (the default alignment),
- Align Top Center,
- Align Top Right,
- Align Center Left,
- Align Center,
- Align Center Right,
- Align Bottom Left,
- Align Bottom Center,
- Align Bottom Right:

Modify text Direction
To change the text direction, select a cell or several cells, and then on the Table Layout tab, in the Alignment group, click the Text Direction button multiple times to cycle through the available directions:
| Left-to-right: |  |
| Top-to-bottom: |  |
| Bottom-to-top: |  |

Change the cell margins
When you fill a table, you can change the cell spacing using the Paragraph options. Word offers the options to change the cell margins:

To customize cells margins, select a cell or several cells, then do one of the following:
- On the Table Layout tab, in the Alignment group, click the Cell Margins button:

In the Table Options dialog box:
- To specify cell margins, in the Default cell margins section, type or select the values for Top, Bottom, Left, and Right margins:

- If you prefer to resize the table according to cell margins and specified spacing, leave the Automatically resize to fit contents check box selected.
If you prefer to leave the table without changes, clear the Automatically resize to fit contents check box.
- To specify cell margins, in the Default cell margins section, type or select the values for Top, Bottom, Left, and Right margins:
- Open the Table Properties dialog box.
In the Table Properties dialog box, on the Cell tab, click the Options... button:

In the Cell Options dialog box:
- Clear the Same as the whole table check box,
- To specify cell margins, in the Default cell margins section, type or select the values for Top, Bottom, Left, and Right margins:

Change the space between cells
To increase or decrease the spacing between cells, select a cell or several cells, then do the following:
- On the Table Layout tab, in the Alignment group, click the Cells Margins button:

In the Table Options dialog box:
- To specify the spacing between cells, in the Default cell spacing section, select the Allow spacing between cells check box, then type or select the value for spacing:

- If you prefer to resize the table according to cell margins and specified spacing, leave the Automatically resize to fit contents check box selected.
If you prefer to leave the table without changes, clear the Automatically resize to fit contents check box.
- To specify the spacing between cells, in the Default cell spacing section, select the Allow spacing between cells check box, then type or select the value for spacing:
For example, spacing between cells = 0.2 inches:

AutoFit features
After filling a table, editing the content, or inserting a text, it is possible to autoformat a table for the perfect look.
To use the Word AutoFit features, do the following:
1. Select a table.
2. On the Table Layout tab, in the Size group:
- To make all columns the same width, click the Distribute Columns button.
- To make each row the same height, click the Distribute Rows button.
- Click the AutoFit button, then choose one of the options:
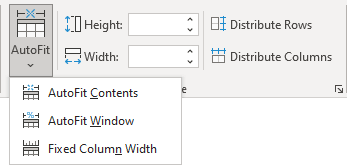
- To fit the columns to the text (or page margins if cells are empty), select AutoFit Contents.
- To fit the table to the document content, select AutoFit Window.
- To keep Word from automatically adjusting the column size, select Fixed Column Width.
