Creating bulleted lists
Not only the Bullet symbol ![]() can be used for the bulleted
lists. As bullets can also be used several regular symbols, such as * (asterisk), - (hyphen), and . -
(period). Historically, the Checkmark or Tick symbol
can be used for the bulleted
lists. As bullets can also be used several regular symbols, such as * (asterisk), - (hyphen), and . -
(period). Historically, the Checkmark or Tick symbol ![]() and the
Index symbol
and the
Index symbol ![]() (representing a
hand with a pointing index finger) were famous for similar uses.
(representing a
hand with a pointing index finger) were famous for similar uses.
Create a bulleted list using the keyboard (using AutoCorrect)
Microsoft Word, by default, automatically changes some special symbols with the followed space if you type them in the first position of the line to the bulleted lists. Some examples:
| Symbol with the followed space | Bulleted list |
|---|---|
| - | |
| * | |
| > | |
| -> | |
| => |
To create a bulleted list, just type the appropriate symbols with the followed space:

Note: If Word doesn't automatically change these symbols, check the AutoCorrect setting for lists (see How to turn off the automatic creation of bulleted and numbered lists).
Create a bulleted list using the mouse
To create a bulleted list, follow the next steps:
1. Type your list, and then select it.
2. Do one of the following:
- On the Home tab, in the Paragraph group, click the Bullets button:

- Right-click on the selection and choose the Bullets button on the Mini toolbar:

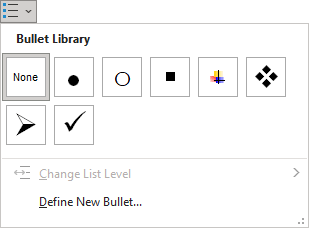
Word creates the bulleted list with the last used bullet symbol or with the bullet symbol ![]() , used by default. You can find different bullet
symbols by clicking the arrow next to Bullets:
, used by default. You can find different bullet
symbols by clicking the arrow next to Bullets:

Choose any of the pre-defined symbols, or define the custom bullet. See customizing bulleted lists for more details.
3. To add additional bulleted items to your list, move the insertion point to the end of a line formatted with a bullet symbol and press Enter:

4. Move the insertion point to the end of the last bulleted item on your list. Press Enter and then Del, or press Enter and click the Bullets button again on the Home tab, in the Paragraph group, to turn off the formatting:

Note: More details are available in the Bulleted lists section in the Work with bulleted, numbered and multi-level lists lesson of the Create basic documents free course.
See also this tip in French: Comment créer des listes à puces.


