Optional design tools in PowerPoint presentation
Ruler
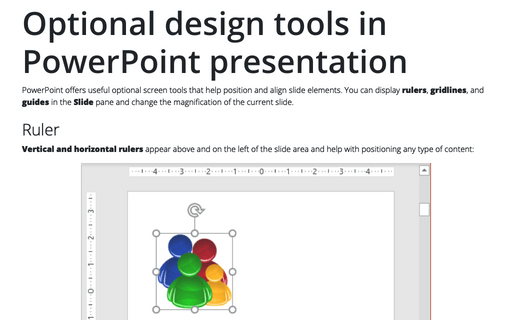
Vertical and horizontal rulers appear above and on the left of the slide area and help with positioning any type of content:

Rulers are especially useful when working with text – they reflect the text frames (it doesn't matter if it's a text in the text box, shape, or another object). The horizontal ruler shows the paragraph indents, and any custom tab stops. It is possible to drag the indent markers on the ruler just as in Microsoft Word:

To turn rulers on or off, on the View tab, in the Show group, select or unselect the Ruler checkbox:

Notes:
- Rulers are available only in the Normal and Notes Page views.
- To change the ruler unit of measure, see how to change PowerPoint units from inches to centimeters and vice versa.
- You can see only the horizontal ruler without the vertical one:

To turn on or off both horizontal and vertical rulers, or only the horizontal ruler (when selecting the Ruler checkbox in the Show group on the View tab), do the following:
1. On the File tab, click the Options button:

2. In the PowerPoint Options dialog box, on the Advanced tab, under Display:

- Select the Show vertical ruler checkbox (selected by default) to display the vertical ruler with the horizontal one when the Ruler checkbox on the ribbon is selected,
- Unselect the Show vertical ruler checkbox to display only the horizontal ruler when the Ruler checkbox on the ribbon is selected.
Gridlines
Gridlines are non-printing thin dotted lines at regularly spaced intervals that help align objects on the slide:

To display or hide gridlines, do one of the following:
- On the View tab, in the Show group, select or unselect the Gridlines checkbox:

- Press Shift+F9.
To modify the spacing between gridlines, do the following:
1. On the View tab, in the Show group, click the dialog box launcher:

2. In the Grid and Guides dialog box, in the Grid settings group, in the Spacing setting, change either the fractional or unit spacing size:

Note: To change the gridline's unit of measure, see how to change PowerPoint units from inches to centimeters and vice versa.
3. Click OK to close the dialog box and apply changes.
Guides
Guides are movable, non-printing vertical and horizontal lines that help with alignment. They can be dragged and dropped anywhere on the slide.
To display or hide guides, do one of the following:
- On the View tab, in the Show group, select or unselect the Guides checkbox:

- Press Alt+F9.
After dragging a guide, a numeric indicator appears to let you know its position:

PowerPoint offers to create additional sets of guidelines by holding down the Ctrl key while dragging a guide to copy it. It is possible to have as many horizontal and vertical guides as needed at the specified positions:


