Send an E-mail later
If needed, schedule an e-mail to be sent at the specified date and time in the future. See below how to schedule an email to be sent later in Outlook for Windows and Outlook for Web.
Set a delay for an email message in Outlook for Windows
To delay the delivery of a currently created message, reply, or forward in Outlook for Windows, open the Properties dialog box by doing one of the following:
- If you use the Simplified ribbon (see more about customizing ribbons):
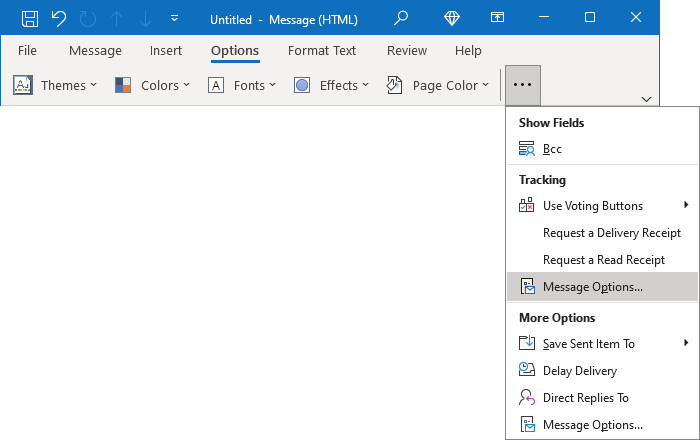
- On the Options tab, click the Delay Delivery button (if you don't see it on the ribbon, click the More commands button - three points to the very right of the ribbon buttons):

- Click the dialog box launch button in the lower right corner of the Tracking groups of the Options tab:

Note: If you don't see it on the ribbon, click the More commands button - three points to the very right of the ribbon buttons, then choose Message Options...:

- On the Options tab, click the Delay Delivery button (if you don't see it on the ribbon, click the More commands button - three points to the very right of the ribbon buttons):
- If you use the Classic ribbon:
- On the Options tab, in the More Options group, click the Delay Delivery button:

- Click the dialog box launch button in the lower right corner of the Tags group of the Message tab or the Tracking or More Options groups of the Options tab:
 or
or
 or
or

- On the Options tab, in the More Options group, click the Delay Delivery button:
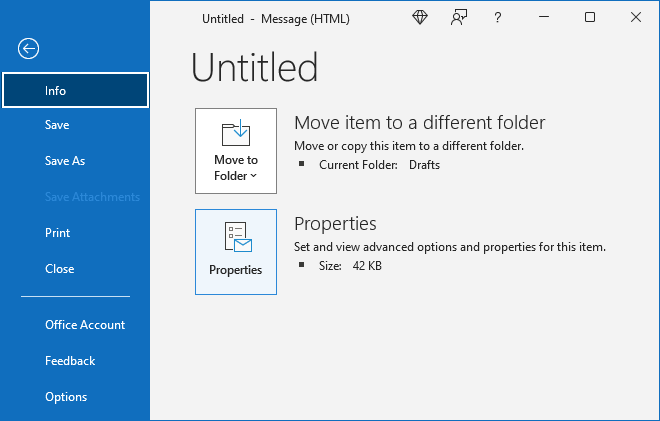
- On the File tab, click the Properties button:

In the Properties dialog box, under Delivery options, select the Do not deliver before checkbox, then specify the date and time from the appropriate drop-down lists:

When the specified date and time are realized, Outlook will attempt to send the e-mail. Clicking the Send button will store the message in the Outbox folder until the designated time is reached:

Notes:
- If Outlook for Windows is not running when the scheduled delivery time of the message is reached, the message is not delivered. The next time you start Outlook, the message will be sent immediately.
- If Outlook for Windows is running, but there is no Internet connection when the message is scheduled to be sent, Outlook will try to deliver the email at the scheduled time but fail. You will see an Outlook send/receive progress error window (see how to send and receive messages in Outlook for more details).
Outlook also automatically tries to send scheduled messages again later. When the connection is restored, Outlook sends the message. If Outlook is configured to work offline at the scheduled delivery time, Outlook automatically sends the message as soon as the account used for the message returns online.
Schedule sending for an email message in Outlook for Web
To set the delivery delay of an email message (it doesn't matter whether it is a new one, reply, or forward), in Outlook for Web, do one of the following:
- If you use the Simplified ribbon (see more about customizing ribbons), on the Options tab, click the Schedule send button:

- If you use the Classic ribbon, on the Options tab, in the Send group, click the Schedule send button:

- After completing the message, click the down arrow at the right of the Send button, then choose Schedule send:

In the Schedule send dialog box, do one of the following:
- Choose any of the proposed timestamps:

- Click the Custom time link to specify the necessary date and time in the Set custom date and time dialog box, then click the Send button. For example:

After clicking the Send button, Outlook saves the message in the Drafts folder till the sending time:

At the top of the draft message, you can see the [Schedule Send] message and the following information about the date and time of the scheduling: "This message is scheduled to send on {data and time}". To change any, click the Schedule Send Options button:

- By clicking the Modify Email option, you open the message for editing, where you can modify the message and the scheduling.
- By clicking the Send Now option, you force Outlook to send this email message immediately without waiting for the scheduling timestamp.
See also this tip in French: Envoyer un courriel plus tard.


