Theme elements in Excel
A document Colors
Each Theme has a predefined set of Colors (in the ScreenTip is Theme Colors) that can be changed separately from the Theme.
Each set of Colors contains text and background colors, accent colors associated with the default colors for chart data series, and hyperlink colors. Also, the Theme Colors are associated with a Color palette (see more about fill and outline options):

Apply a set of Colors
To apply a set of Colors, do the following:
1. On the Page Layout tab, in the Themes group, click the Colors button, then choose a Color set:

The Colors list displays all the predefined sets of Colors in the Office section and the custom sets in the Custom section (if available, i.e., if *.xml files are found in the Theme Colors folder - see how to create a custom set of Colors for more details).
2. Point to a set of Colors and observe the preview on the document. Click the set of Colors to apply it.
Note: The first set of Colors in the Office section is the colors in the current Theme.
Create a custom set of Colors
Like other Microsoft applications, Excel allows modifying 12 color elements: four text and background colors, six accent colors (the first six default chart colors), and two hyperlink colors.
To create a new set of Colors, click the Customize Colors... option at the bottom of the Colors list. In the Create New Theme Colors dialog box:

- Assign a color to every of the 12 color placeholders (see how to apply a solid color) you want to change,
- Type a name for the new Theme Colors in the Name field,
- Click the Save button to save a created custom set of Colors.
See more about changing the default colors that Excel uses for chart series.
A custom set of Colors is saved as a *.xml file in the Theme Colors folder and automatically added to the top of the Colors list in the Custom section.
The location of the Theme Colors folder may vary, but it is usually located here:
C:\Users\
Note: If you try to create a new custom set of Colors with the same name as an existing one, Excel automatically adds a number 1 at the end of the name you enter. So, you need to delete the old set of Colors and rename the new one by renaming the corresponding *.xml file in the Theme Colors folder.
Modify a custom set of Colors
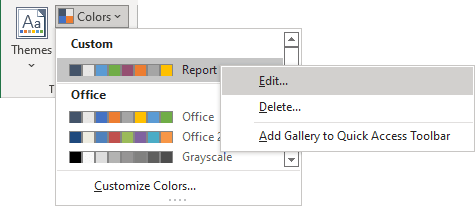
To modify a custom set of Colors, right-click on it in the Colors list, then choose Edit... in the popup menu:
Share a custom set of Colors
A custom set of Colors is only available to the current Windows user logged in to the PC, tablet, etc. To share it with other users or locations, do the following:
1. In the Theme Colors folder (see where you can find the Theme Colors folder), find the *.xml file with the custom name you want to share.
2. Copy this *.xml file to another location you need or send it.
Note: A custom set of Colors should be placed in the Theme Colors folder to appear in the Colors list. All *.xml files from that folder automatically appear in the Custom section of the Colors list.
Delete a custom set of Colors
To delete a custom set of Colors, do one of the following:
- In the Windows Explorer, open the Theme Colors folder (see where you can find the Theme Colors folder), then delete the *.xml file with the name of the custom set of Colors you want to delete.
- On the Page Layout tab, in the Themes group, click the Colors button.
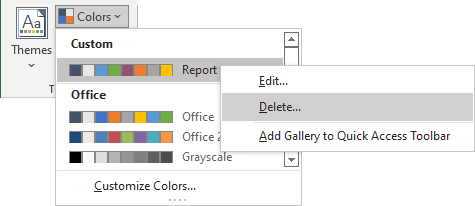
In the Custom section of the Colors list, right-click the custom set of Colors, then choose Delete... in the popup menu:
A document Fonts
Each Theme uses two fonts, one for headings and one for the body of the document:

Apply a Fonts set
To apply a Fonts set (in the ScreenTip is Theme Fonts), do the following:
1. On the Page Layout tab, in the Themes group, click the Fonts button, then choose a set:

The Fonts list displays all the predefined Fonts sets in the Office section and the custom sets in the Custom section (if available, i.e., if *.xml files are found in the Theme Fonts folder - see how to create a custom Fonts set for more details).
2. Point to a Theme Fonts set and observe the preview on the document. Click the Fonts set to apply it.
Create a custom Fonts set
To create a new Fonts set, click the Customize Fonts... option at the bottom of the Fonts list. In the Create New Theme Fonts dialog box:
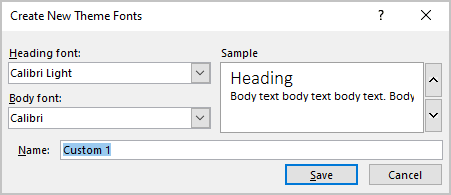
- Choose fonts you prefer from the Heading font and Body font lists.
In the Sample area, see how your choice will look like.
- In the Name field, type a name for the new Fonts set.
- Click the Save button.
A custom Theme Fonts set is saved as a *.xml file in the Theme Fonts folder and automatically added to the top of the Fonts list in the Custom area.
The location of the Theme Fonts folder may vary, but it is usually located here:
C:\Users\
Note: If you try to create a new custom Fonts set with the same name as an existing one, Excel automatically adds a number 1 at the end of the name. So, you need to delete the old Fonts set and rename the new one by renaming the corresponding *.xml file in the Theme Fonts folder.
Modify a custom Fonts set
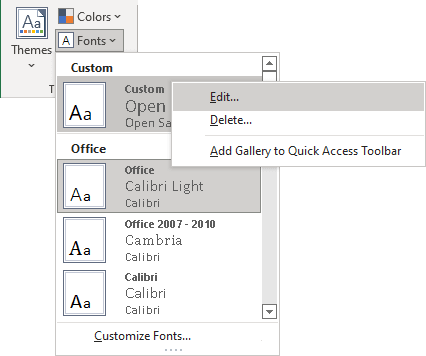
To modify a custom Fonts set, right-click on it in the Fonts list, then choose Edit... in the popup menu:
Share a custom Fonts set
A custom Fonts set is only available to the current user logged in to the PC, tablet, etc. To share it with other users or locations, do the following:
1. In the Theme Fonts folder (see where you can find the Theme Fonts folder), find the *.xml file with the name you want to share.
2. Copy this *.xml file to another location you need or send it.
Note: A custom Fonts set should be placed in the Theme Fonts folder. All *.xml files from that folder automatically appear in the Custom section of the Fonts list.
Delete a custom Fonts set
To delete a custom Fonts set, do one of the following:
- In the Windows Explorer, open the Theme Fonts folder (see where you can find the Theme Fonts folder), then delete the *.xml file with the name of the custom Fonts set you want to delete.
- On the Page Layout tab, in the Themes group, click the Fonts button.
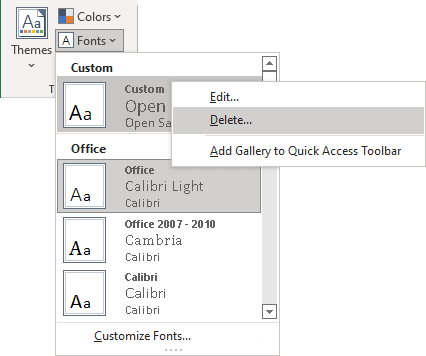
In the Custom section of the Fonts list, right-click the custom Fonts set, then choose Delete... in the popup menu:
A document Effects
Theme Effects control the appearance of graphic objects (charts, shapes, SmartArt, etc.) such as drop shadows, beveled edges, and textures. You can choose a different set of Effects, but you can't customize them or create a new one.
To apply a set of Effects (in the ScreenTip is Theme Effects), do the following:
1. On the Page Layout tab, in the Themes group, click the Effects button, then choose one of the sets:
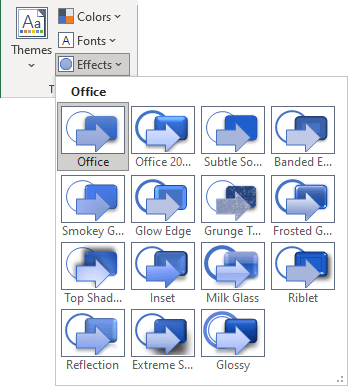
2. Point to a Theme Effects set and observe the preview on the document. Click the chosen Effects set to apply it.
