How to Recover Unsaved Word Document on Mac - A Comprehensive Guide
In this article, we present effective methods to recover unsaved Word documents on Mac, minimizing potential losses. Additionally, we address scenarios where you need to recover deleted, lost, or unsaved Word documents due to accidental deletion, unintentional file replacement, or malware infection. Our guide includes easy-to-follow methods like using Word's built-in features, restoring from Time Machine backups, and using third-party software.
With these practical solutions at your disposal, you can confidently navigate the process of recovering unsaved Word documents on your Mac, ensuring the preservation of your valuable work.
Part 1. How Do I Recover an Unsaved Word Document from AutoRecovery
An effective method for recovering unsaved Word documents involves utilizing the AutoRecovery feature in Microsoft Office applications. When this feature is enabled, the software automatically saves previous versions of your Word files at 10-minute intervals, allowing you to potentially recover unsaved work.
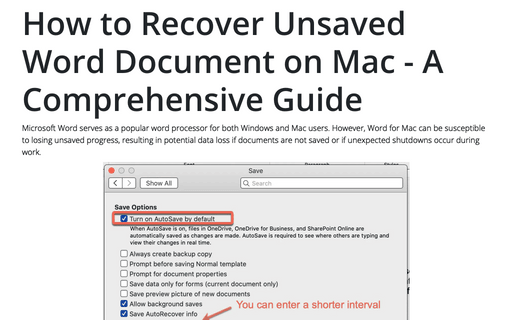
To verify whether the AutoRecover functionality is activated on your Mac, follow these straightforward steps:
- Open Word and navigate to "Preferences" and then click on "Save" under the "Output and Sharing" tab.
- Look for the "Turn on AutoSave by default" checkbox and ensure it is checked (refer to the picture below for details).

There are two methods to find AutoRecover files in Word for Mac and ensure the recovery of your valuable work in case of unexpected disruptions or system issues.
Method A. You could find AutoRecover files from Finder search.
Open the Finder on your Mac computer, and type "autorecovery" in the search box, the Finder will show you all files containing the word instantly.
Method B. You can find AutoRecover files using the Folder path.
Step 1: In the Finder on your Mac, select the "Go" menu and click on "Go to Folder."
Step 2: Depending on the Word version you are using, enter the appropriate file path:
For Microsoft Office 2019/2016/Office 365 in 2020/2021:
~/Library/
For Microsoft Office 2011:
~/Library/
For Microsoft Office 2008:
/Documents/
To recover unsaved Word documents on Mac for other versions (2021/2020/2019/2016/2011/2008), follow the two-step process below:
Step 1: Find the unsaved Word files you wish to recover, and double-click on them to open.

Step 2. After opening the unsaved file, click on "File" in the menu bar, then select "Save As." Choose a new location to save the recovered document and give it your desired file name.
Part 2. Recover the Unsaved Word Document Files from Temporary Folder on Mac
macOS includes several temporary folders that house temporary files, primarily designed for advanced Mac users. If you encounter the need to recover unsaved Word documents, you can follow these technical steps to attempt retrieval from the temporary folders.
Step 1: Accessing the Terminal
a. Open Finder and navigate to Applications.
b. Click on Utilities and choose Terminal.
c. In the Terminal window, type "open $TMPDIR" and press Enter.
Step 2: Locating Temporary Word Files
a. The Terminal will open the Temporary folder.
b. Look for files with names starting with "~Word Word."
c. Optionally, open these files with TextEdit to view their contents. You can copy the text and paste it into a new Word document.
Step 3: Saving the Recovered Document
a. Determine the unsaved Word document you wish to recover.
b. Click on "File" in the menu bar and select "Save As."
c. Save the document to your desired location with a new file name.
This method is recommended for advanced users who are familiar with Terminal operations. You should exercise caution while navigating the temporary folders to avoid unintentional modifications or deletions of crucial files.
Part 3. Introducing Three Methods to Recover Deleted Word Files on Mac
Method 1: Recover Word document from the Trash on macOS
One of the quick ways to retrieve a deleted Word document is by locating it in the Trash, where files are retained for up to 30 days.
- Access the Mac's dock and locate the Trash icon, then click on it to open.
- Carefully search the files in the Trash and locate the Word document(s) you wish to recover.
- Right-click on each file and select "Put Back." This action will restore the recovered Word document to its original location.
In case you cannot recover your file using this method, do not worry, as we will explore other effective methods for recovering Word files on Mac.
Method 2: Recover an Unsaved Word Document with Time Machine
Time Machine serves as the native incremental backup feature for modern Macs, enabling regular backups to restore files, folders, system files, or even the entire computer to a previous date. If you have previously activated Time Machine before experiencing data loss, you can recover your unsaved Word document by following four simple steps.
Step 1: Ensure Proper Connection of Time Machine Backup Disk
Check that the Time Machine backup disk is connected to your iMac/MacBook.
Step 2: Access the Specific Folder Containing the Deleted Word File(s)
Open the folder where the deleted Word file(s) were located.
Step 3: Launch Time Machine
Navigate to Launchpad > Other > Time Machine to launch the Time Machine application.
Step 4: Restore the Deleted Word File
Using the timeline and arrows provided, locate and review the deleted Word files. Once you find the file you wish to recover, select it and click "Restore."

Method 3: Retrieve Deleted Word Documents with Data Recovery Tool for Mac
In scenarios where your Microsoft Word documents are no longer present in the Trash folder and you lack an actual Time Machine backup, employing a third-party data recovery tool such as iBoysoft Data Recovery for Mac is the optimal solution. This professional software possesses robust capabilities, conducting an extensive scan of your file system to identify all recoverable files that may not be visible to the naked eye. It can be used to recover files from the SD card on Mac.
Avoid storing any new files on your Mac to increase the likelihood that the deleted Word file can be recovered. Swiftly recovering the files takes precedence. The following tutorial demonstrates how to recover a deleted Word document using iBoysoft Data Recovery software.
1. Download the Software and Install it
A helpful tip: Prepare an external storage device like a USB flash drive or an external hard drive to store the recovered files, thus preventing overwriting of the disk containing the deleted Word files.
2. Filter and Locate the Lost or Deleted Word Documents
Upon completion of the data scanning process, use filters or the search bar to narrow down the results and locate the lost or deleted Word documents you wish to recover.

3. Preview and Recover the Lost Word Document
Preview each file by pressing the Spacebar and select the file you need. Click "Recover" to promptly recover the lost Word document to a new location.

