Apply or remove cell borders
Apply cell borders
To apply cell borders:
- Using the mouse: do one of the following:
- On the Home tab, in the Font group, click the arrow next to Borders:

Then choose a border style from the palette:

- Under Borders, choose any of the predefined 13 styles,
- Under Draw Borders, use tools to create a custom style:
Click Draw Border or Draw Border Grid to create borders by dragging the mouse. When selecting any of these options, your cursor changes to the pencil
 .
.Draw Border allows to draw a single border, multiple borders, or a border around the selected area:

Draw Border Grid allows to draw a single border, multiple borders, or the borders of all cells in the selected area:

To stop drawing borders, click Draw Border or Draw Border Grid on the Borders toolbar again or press Esc to discard the drawing tool.
- Click Line Color
 and then click the color that you want to use.
 - Click the arrow next to Line Style
 and choose the style you want to use:

If you want to use another borders style, choose the More Borders... button to open the Format Cells dialog box.
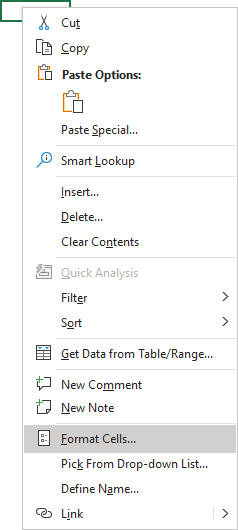
- Choose Format Cells... from the popup menu to open the Format Cells dialog box:

In the Format Cells dialog box:

Click the line style and color you want, then click one or more buttons to indicate the border placement.
- On the Home tab, in the Font group, click the arrow next to Borders:
- Using the keyboard: use the next shortcut keys:
Alt+P Apply or remove the top border
Alt+B Apply or remove the bottom border
Alt+L Apply or remove the left border
Alt+R Apply or remove the right border
Alt+H If cells in multiple rows are selected, apply or remove the horizontal divider
Alt+V If cells in multiple columns are selected, apply or remove the vertical divider
Alt+D Apply or remove the downward diagonal border
Alt+U Apply or remove the upward diagonal border
Remove cell borders
To remove cell borders:
- Using the mouse: do one of the following:
- On the Home tab, in the Font group, click the arrow next to Borders and choose Erase Border
 , and then do one of the following:
- To remove a single border, click that border with the eraser tool
- To remove more than one border, drag the eraser tool across the borders that you want to remove.
To stop erasing borders, click Erase Border on the Borders toolbar again to discard the eraser tool.
- Choose Format Cells... from the popup menu to open the Format Cells dialog box. Click one or more buttons to unselect the border placement.
- On the Home tab, in the Font group, click the arrow next to Borders and choose Erase Border
- Using the keyboard: use the next shortcut keys:
Ctrl+Shift+_ Border lines off,
Ctrl+Shift+& Border lines on.
See also this tip in French: Appliquer ou supprimer des bordures de cellules.

