Adding a header and footer to the worksheet
The header shows the information at the top of every printed page. The footer shows the information at the bottom of every printed page. By default, new workbooks do not have headers or footers.
To add a header and footer to your worksheet, follow the next steps:
1. Do one of the following:
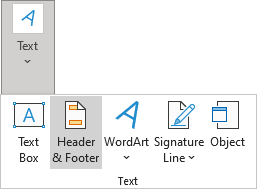
- On the Insert tab, in the Text group, click Header & Footer:
 or
or

Note: After clicking the Header & Footer button, Excel automatically switches the spreadsheet to the Page Layout view.
- On the View tab, in the Workbook Views group, click Page Layout:

Excel displays the worksheet in Page Layout view, where Excel shows sections Add header and Add footer:

You can also click Page Layout view ![]() on the status bar to display this view:
on the status bar to display this view:
2. Click the left, center, or right header or footer text box at the top or the bottom of the worksheet page (note that headers and footers consist of three sections: left, center, and right):


Clicking any text box selects the header or footer and displays the Header & Footer tab:

3. On the Header & Footer tab, in the Header & Footer Elements group, select the element that you want:
- In the Header & Footer group, from the Header or Footer dropdown lists, choose one of the proposed header or footer templates:

Some items in these lists consist of multiple parts, separated by a comma.
- In the Header & Footer Elements group, select one or several of the proposed functions (you can also use codes):
Button Code Function 
Page Number & [Page] Displays the page number 
Number of Pages & [Pages] Displays the total number of pages to be printed 
Current Date & [Date] Displays the current date 
Current Time & [Time] Displays the current time 
File Path & [Path] & [File] Displays the workbook's complete path and filename 
File Name & [File] Displays the workbook name 
Sheet Name & [Tab] Displays the sheet's name 
Picture Enables you to add a picture See Adding watermarks to workbook for more details.

Format Picture Enables you to change an added picture's settings See Adding watermarks to workbook for more details.
Notes:
- You can combine text and codes and insert as many codes as possible into each section.
- To insert an ampersand (&) into headers or footers, enter the ampersand twice.
For example, to enter the text Headers & Footers, type Headers && Footers.
- To apply different fonts and sizes in headers and footers, just select the text and use the formatting tools:
- On the Home tab, in the Font group, use the formatting tools:

- On the mini toolbar that appears automatically when you select text:

- On the Home tab, in the Font group, use the formatting tools:
- You can add more than one line in any section of headers or footers: press Enter to force a line break. See more about page margins.
- Excel doesn't provide a possibility to insert the content of a specific cell into the header or footer.
- In the Navigation group, there are two buttons that help to switch between headers and footers:
 Go to Header is active when any section of a footer is active.
 Go to Footer is active when a cursor is positioned in a header section.
- In the Options group, specify any of the options:
- Select the Different First Page option (unselected by default) to specify a different header/footer for the first printed page.
- Select the Different Odd & Even Pages option (unselected by default) to specify a different header or footer for odd and even pages. See How to create different headers and footers on odd and even pages for more details.
- If the Scale with Document option is selected (selected by default), the font size in the header and footer will be resized accordingly if the document is scaled when printed.
- If the Align with Page Margins is selected (selected by default), the left header and footer will be left-aligned, and the right header and footer will be right-aligned.
Note: To return to the Normal view, on the View tab, in the Workbook Views group, click Normal:

You can also click ![]() Normal on the status bar:
Normal on the status bar:
See also this tip in French: Comment ajouter un en-tête et un pied de page à la feuille de calcul.

