How to create and apply a Signature in Outlook for Web (Outlook online)
Typically, the Signature is formatted text that identifies the sender and provides some contact information. Signatures often include the sender's company name, job title, legal disclaimer, company/personal slogan, photo, etc.
In Outlook for Web (Outlook online), you can set up several different signatures for different purposes. For example, you can create one signature that contains more information to send with initial email messages and another signature that contains less information to send with replies and forwards:

We strongly recommend leaving a little more information in the signature than just Best regards or even Regards. Very often, we receive mail with such signatures. Sometimes, it is impossible to determine from the e-mail address how to contact the respondent. It is often difficult to determine which of the letters is a first name and which is a last name, even if the address includes both.
Attention! Many people receive email on mobile phones and other devices that may not always recognize unusual formats. For this reason, it is best to use a relatively simple signature. In addition, it is also a good idea to use a short signature.
For some Outlook for Web accounts, Microsoft creates one simple signature named Outlook Web Signature that contains the phrase "Send from Outlook."
Create a new Signature in Outlook for Web
To create a new signature, do one of the following:
- Click on the
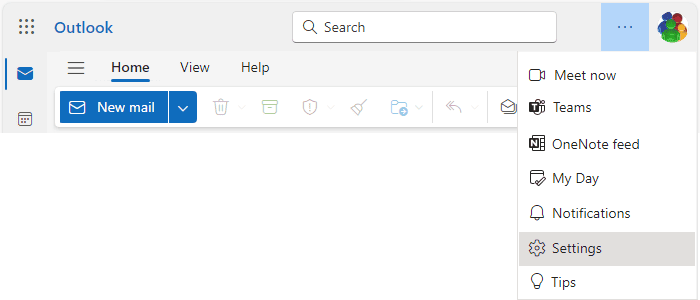
 Settings button in the upper right corner of the page:

or

- On the View tab, click the Settings button:

- Create a new message by clicking the New mail button or pressing the N key. On the Insert tab, click the Signature button, then choose Signatures...:
- If you create a new message on the Reading pane:

- If you open a new message in the separate window:

It can also look like this (if you use the Classic ribbon instead of Simplified; see more about customizing ribbons in Outlook for Web):

- If you create a new message on the Reading pane:
In the Settings dialog box, on the Mail tab, in the Compose and reply group, under Create and edit signatures:
- If you see the Edit signature name field, you don't have any existing signature, so:

- In the Edit signature name field, type a name for the new signature,
- In the text box below, type or paste the new signature context, such as your name, company name, and contact information.
You can use the available formatting tools:

You can format the text of the e-mail signature in the same way that you format the text of your message. If you want to apply formatting that is not available from the buttons at the bottom of the Edit signature name field, such as padding, text wrapping around pictures, and graphics, you can:
- Create and format your signature in the message window or another Microsoft application, such as Word or PowerPoint,
- Copy the signature, and then paste it into this field.
- Click the Save button to save the new signature:

- If you see the existing signature instead of the Edit signature name field, click the + New signature link:

Assign automatic Signature
To add the signature to all new messages and all replies and forwards, in the Settings dialog box, on the Mail tab, open the Compose and reply group, under Select default signatures:
- To assign a signature to all new messages, from the For New Messages dropdown list, select the signature you prefer.
- To assign a signature to all response messages you send from the selected account, from the For Replies/Forwards dropdown list, select the appropriate signature:

If you want to turn off inserting any signature in new messages or your replies and forwards, select (No signature).
- Click the Save button to apply the choices.
Modify or delete a signature
To edit, rename, or delete a signature, in the Settings dialog box, on the Mail tab, in the Compose and reply group, under Create and edit signatures, from the dropdown list with signatures, select the signature you need to modify or remove:

To edit the selected signature, under the signature name, make changes for the selected signature, then click the Save button to apply changes:

To rename the selected signature, click the Rename button, then change the name in the Edit signature name field and click Save:

To delete the selected signature, click the Delete button, then click the Save button to delete the signature.
Apply a Signature manually
If you assign some signature as the default in the Settings dialog box, in the Select default signature group (see above), it will be automatically added to the appropriate message type (new messages and/or replies and forwards).
To add a signature to a message manually, on the Insert tab (it doesn't matter whether the message is open in a separate window or the Reading pane), in the Include group, click Signature, then select the signature you want to insert:

It can also look like (if you use the Classic ribbon instead of Simplified):

Outlook inserts the selected signature at the end of the message, replacing any existing email signature.
To remove an email signature from a message
Select and delete the signature content on the message as you would any other message content.


