Send and receive messages in Outlook for Windows

You can change the intervals between sending and receiving e-mail at any time and cancel sending and receiving messages immediately.
Send a message
After clicking the Send button, Outlook moves the message to the Outbox folder:

- Attention! Because messages are not sent immediately, it is not recommended to turn off or close Outlook immediately after clicking the Send button. Many miscommunication problems are caused by the sender being convinced that the message has been sent and immediately turning off the computer or closing the laptop after pressing the Send button. In fact, the system needs some extra time to send messages.
Therefore, before you close Outlook, turn off the computer or laptop and ensure no unsent messages are in your Outbox folder.
The message will be sent only in the Send/Receive session if there are no unexpected errors. Automatically, Outlook moves sent messages from the Outbox folder to the Sent folder (used by default if there are no other settings for outgoing messages - see more about saving copies of messages in the Sent Items folder).
Note: If Outlook is configured to send messages immediately after you click the Send button, you won't be able to change anything about your message before it's routed to the recipients (unless you're using Exchange Server).
See also how to send a message later or create a rule to send all messages with some delay.
Send and receive messages manually
To start a Send/Receive session, do one of the following:
- On the Quick Access Toolbar, click the Send/Receive All Folders button (or press F9):

- If you use the Simplified ribbon (see more about customizing ribbons):
- On the Home tab, click the Send/Receive All Folders button (if you don't see it on the ribbon, click the More commands button - three points to the very right of the ribbon buttons):

- On the Send / Receive tab, click the Send/Receive All Folders or Send All button:

- On the Home tab, click the Send/Receive All Folders button (if you don't see it on the ribbon, click the More commands button - three points to the very right of the ribbon buttons):
- If you use the Classic ribbon:
- On the Home tab, in the Send/Receive group, click the Send/Receive All Folders button:

- On the Send / Receive tab, in the Send & Receive group, click the Send/Receive All Folders or Send All button:

- On the Home tab, in the Send/Receive group, click the Send/Receive All Folders button:
Configure Outlook to not send messages automatically for all accounts
By default, Outlook sends messages automatically as soon as they are placed in the Outbox folder. To configure Outlook to store messages in the Outbox folder until they are manually sent, follow these steps:
1. On the File tab, click Options:

2. In the Outlook Options dialog box, select the Advanced tab.
Note: You can easily open the Advanced tab in the Outlook Options dialog box by right-clicking the More Apps icon in the Navigation bar and choosing Options in the popup menu:
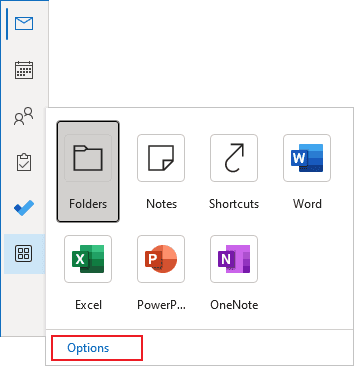
See more about customizing the Navigation bar in Outlook.
3. In the Outlook Options dialog box, on the Advanced tab, under Send and receive, clear the Send Immediately when connected checkbox:
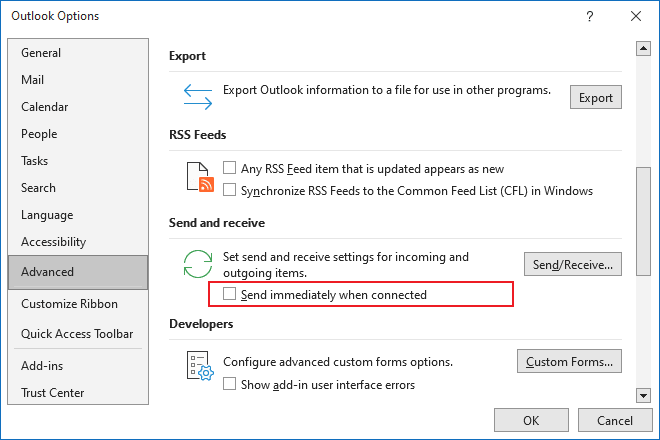
4. Click OK to close the Outlook Options dialog box.
Temporarily turn off the automatic send/receive in Outlook for all accounts
In addition to customizations in the Outlook Options dialog box, you can turn off the automatic sending of messages using the ribbon command. Use the following command to temporarily store messages in your Outbox folder until they can be sent manually:
- If you use the Simplified ribbon (see more about customizing ribbons), on the Send / Receive tab, click the Send/Receive Groups dropdown list (if you don't see it on the ribbon, click the More commands button - three points to the very right of the ribbon buttons), then choose Disable Scheduled Send/Receive:

- If you use the Classic ribbon, on the Send / Receive tab, in the Send & Receive group, click the Send/Receive Groups button, then select Disable Scheduled Send/Receive:

Change the intervals between sending and receiving e-mail
By default, Outlook tries to send messages automatically every 30 minutes. To change the scheduled send/receive interval, in the Send/Receive Groups dialog box (see below how to open this dialog box):

- Select the Schedule an automatic send/receive every {X} minutes checkbox,
- Type the number of minutes between each session of sending/receiving messages. The number should be between 1 (each minute) and 1440 (once a day).
Click the Close button to apply the changes and close the dialog box.
Configure Receive-Only account in Outlook - not send messages automatically for the account
By default, Outlook automatically starts sending and receiving sessions according to your settings. You may need a Receive-Only account, such as a technical account used only to receive incoming support requests.
To customize a Receive-Only email account, follow these steps:
1. Open the Send/Receive Groups dialog box (see below for how to open this dialog box).
2. In the Send/Receive Groups dialog, click the Edit... button:

3. In the Send/Receive Settings dialog box, clear the Send mail items checkbox, then click OK to apply changes:
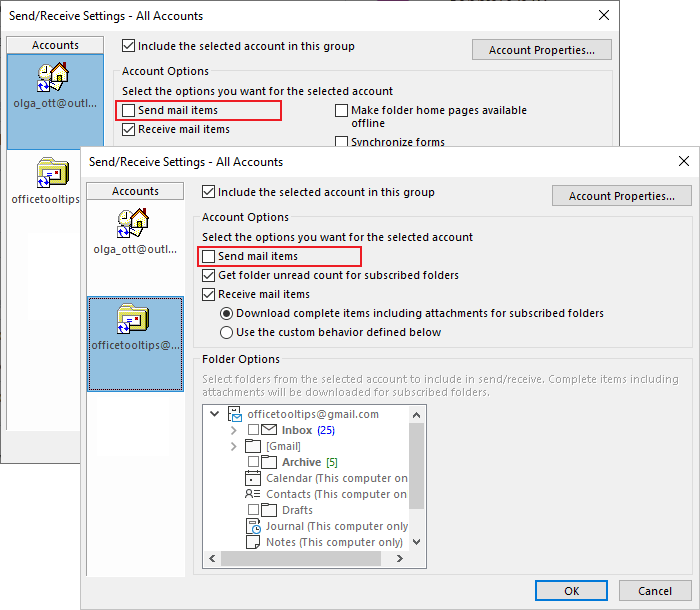
Note: You can create a new group of Send-Only accounts (see how to work with groups of accounts).
Configure Send-Only account in Outlook - not receive messages automatically for the account
By default, Outlook automatically starts sending and receiving sessions according to your settings. For some reason, you may need a Send-Only account, such as a technical one used only to send notifications.
To customize a Send-Only email account, follow these steps:
1. Open the Send/Receive Groups dialog box (see below for how to open this dialog box).
2. In the Send/Receive Groups dialog, click the Edit... button:

3. In the Send/Receive Settings dialog box, clear the Receive mail items checkbox, then click OK to apply changes:
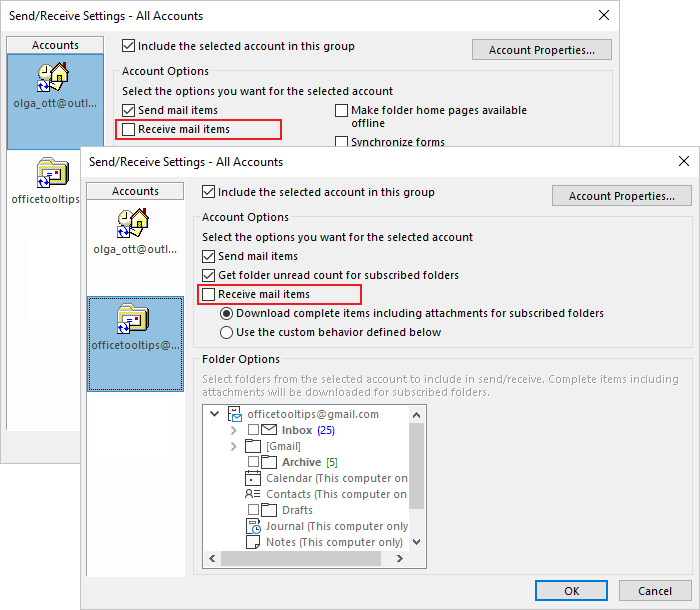
Note: You can create a new group of Send-Only accounts (see how to work with groups of accounts).
Open the Send/Receive Groups dialog box
To open the Send/Receive Groups dialog box by doing one of the following:
- On the File tab, click Options:

In the Outlook Options dialog box, select the Advanced tab.
Note: You can easily open the Advanced tab in the Outlook Options dialog box by right-clicking the More Apps icon in the Navigation bar and choosing Options in the popup menu:

See more about customizing the Navigation bar in Outlook.
In the Outlook Options dialog box, on the Advanced tab, under Send and receive, click the Send/Receive... button:
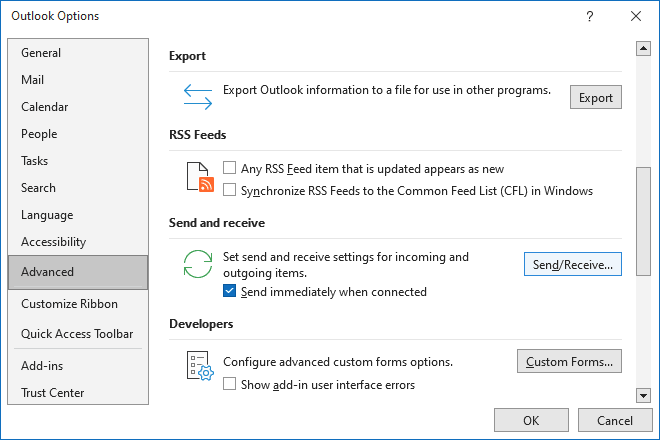
- If you use the Simplified ribbon (see more about customizing ribbons), on the Send / Receive tab, click the Send/Receive Groups dropdown list (if you don't see it on the ribbon, click the More commands button - three points to the very right of the ribbon buttons), then choose Define Send/Receive Groups:
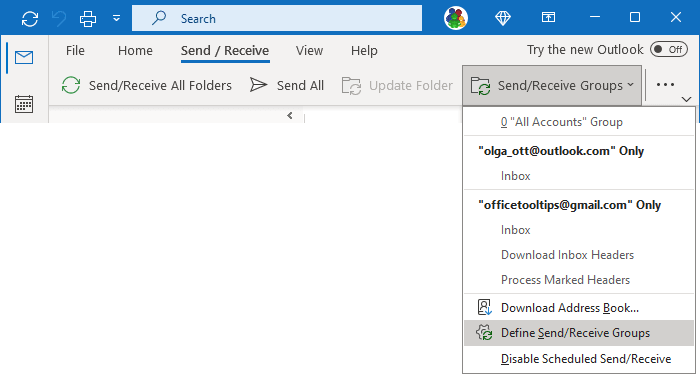
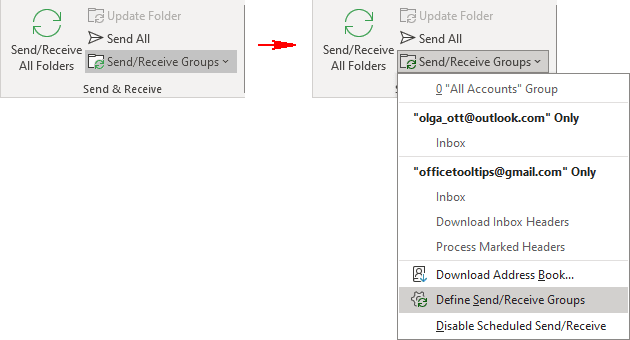
- If you use the Classic ribbon, on the Send / Receive tab, in the Send & Receive group, click the Send/Receive Groups button, then choose Define Send/Receive Groups:
- Press Ctrl+Alt+S.
Outlook opens the Send/Receive Groups dialog box:

