Saving workbooks
Save an opened workbook with the same name
To save the opened workbook with the same name to the current location:
- On the File tab, click Save, or Save a Copy.
- Click the Save button on the Quick Access Toolbar (if this button is visible):

See how to add commands to the Quick Access Toolbar.
Note: The button can look like
 if the workbook is saved on OneDrive or another network folder.
 - Press Ctrl+S.
Save the opened workbook with a different name to the local PC
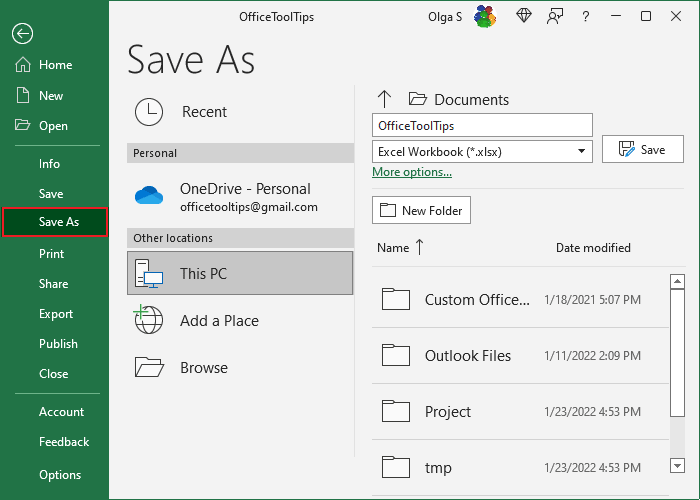
On the File tab, click Save As to open the Save As pane:

- On the left side of the Save As pane, select the This PC option.
- On the right side:
- If needed, change the location by:
- Select any of the most used folders such as Project, tmp, etc.
- Click the More options... option to open the Save As dialog box.
- Type the name of your document and click the Save button.
- If needed, change the location by:
Save the opened workbook to OneDrive
To save a workbook to OneDrive (or other external location such as Dropbox), do the following:
- On the File tab, click Save.
On the Save As pane:
- On the left side of the Save As pane, click the OneDrive,
- On the right side, type the name of your document and click the Save button:

- Click the Save button on the Quick Access Toolbar (if this button is visible) or click Ctrl+S on the keyboard.
In the Save this file dialog box, type the file name, and click the Save button:

Note: If you changed the dialog box's path, you see a different folder instead of Documents on OneDrive. Choose the correct folder in the Choose a Location drop-down list.
Automatically save documents
Saving any document, workbook, presentation periodically as you work is crucial to prevent information loss. Making Excel save it automatically will reduce the chance of losing data in case of a power failure or other interruption.
1. On the File tab, click Options.

2. In the Excel Options dialog box, on the Save tab, under Save Documents:
- Click the Save AutoRecover information every checkbox,
- To adjust the time interval between saves, in the Minutes box, use the arrows to select a time or type a time for how often Excel saves your workbook:

3. Click OK to close the dialog box.
See also this tip in French: Enregistrement des modifications dans les classeurs existants.


