A perfect text alignment using tabs
A tab stop is the position at which the text-insertion point stops when you press the Tab key. Pressing the Tab key moves the insertion point to the right, shifting the position at which you will insert text.
Word documents are set up with default tab stops every 1/2-inch across the document, but you can set your own tab stops, too, wherever you want them. In fact, there are several different types of tab stop that you can use (left, centered, right, decimal, or bar) and a variety of other options, too.
![]() Left-aligned - Begins text at the tab stop (This is the default tab setting).
Left-aligned - Begins text at the tab stop (This is the default tab setting).
![]() Center-aligned - Centers text on the tab stop.
Center-aligned - Centers text on the tab stop.
![]() Right-aligned - Ends the text at tab stop.
Right-aligned - Ends the text at tab stop.
![]() Decimal - Centers text over decimal point for a list of numbers.
Decimal - Centers text over decimal point for a list of numbers.
![]() Bar - Runs a vertical line through a selected paragraph at the tab stop.
Bar - Runs a vertical line through a selected paragraph at the tab stop.

When you set a custom tab, all the default tabs to the left of the custom tab are cleared - that is, when you press Tab, Word will ignore the default tabs and go to the first custom tab.
There is an advantage to using tabs rather than spacing. After the tabs are in your document, you can move or change the tab stops and then the selected text moves or realigns with those stops. Remember, however, that tabs belong to paragraphs. If you set tab stops as you type text and press Enter, the tab settings carry forward to the next paragraph.
Note: In most cases, the text is in proportional font. Because proportional-font characters take up different amounts of space, the text in that font cannot be aligned correctly using spaces.
To show or hide the horizontal and vertical rulers, click View Ruler at the top of the vertical scroll bar:

Note: The vertical ruler will not appear if it is turned off. To turn on the vertical ruler, do the following:
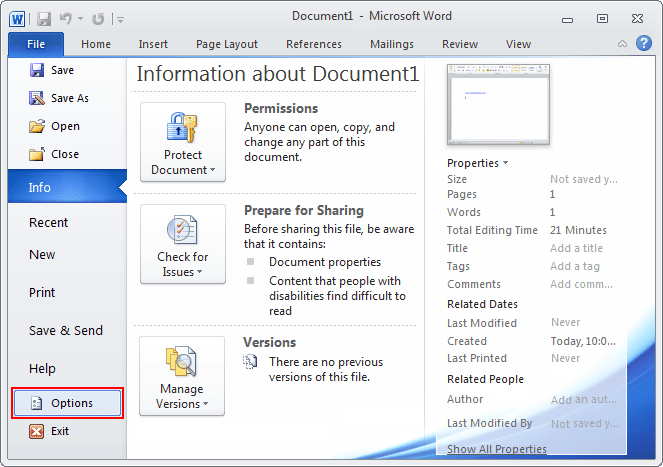
1. On the File tab, click the Options button:

2. Choose the Advanced tab.
3. Under Display, select the Show vertical ruler in Print Layout view check box.


